

Master Roster Templates
A Master Roster is a reusable, repeating pattern of shifts that you build once and then assign to employees. Instead of scheduling the same shift pattern by hand for every employee, every period, you define it a single time and biotime rolls it forward automatically.
Think of it as a template for “how this role normally works”:
Days: Monday–Friday, 9:00–17:00 with a 30-minute break for waged or salary staff.
A rotating 4-week pattern of early, late and night shifts for the nursing team.
Weekend security: Saturday and Sunday, 18:00–06:00.
Master Rosters are especially useful for employees with repetitive schedules — they reduce manual re-entry and improve the accuracy of reporting.
On this page
Why use Master Rosters
1
Save time
Build a pattern once instead of rebuilding it every cycle — weekly, fortnightly, four-weekly, or monthly.
2
Stay consistent
Change the pattern in one place and it flows through to everyone assigned to it.
3
Handle any rotation
Weekly, fortnightly, four-weekly, monthly, or longer — not just a single week.
Master Roster vs. the everyday roster
| Tool | What it is | When you use it |
|---|---|---|
| Master Roster | A reusable, repeating shift pattern assigned to employees. | To set up and maintain a standard working pattern. |
| Group Master Roster | The same idea, but for a whole team — each shift specifies how many employees are needed to cover it. | When you’re planning coverage for a group, not one employee’s routine. |
| Everyday roster Planner / Employee Roster | The actual shifts on real calendar dates for real employees. | For day-to-day changes, swaps, and one-off adjustments. |
The Master Roster is the blueprint. The everyday roster is what gets generated from it — and you can still adjust it for one-off changes without touching the Master Roster itself.
Need pay/award day definitions instead of shift times? That’s a separate tool called a Work Pattern.
Building a Master Roster
- Go to Configuration → Rosters, and click the + in the Master Roster section.
- Give it a clear name and description — these are sorted alphabetically in the list view, so name patterns for what they are (e.g. “Fortnightly Rotating Nights”), not who’s currently on them.
- Set the period length — 7 days by default, but this can be adjusted to match how your roster actually rotates: a fortnight (14 days), four weeks (28 days), monthly, or longer if needed.
- If you use roster acceptance in self-service, decide whether the Accepted box should be checked. This is optional and only relevant if employees accept or decline their own shifts:
- Checked — shifts generated from this template are accepted straight away.
- Unchecked — shifts start as pending, so employees can accept or decline them via self-service.
- Add shifts. Hover over the start time on the grey bar, click and drag to set the shift’s duration. You can:
- drag from the middle to move a shift, or resize from the edges to change its length
- click a shift to set its position, job number, or any custom fields
- set break minutes on the shift or from the right-hand side
- use the clipboard icon to copy a shift across multiple days — much quicker than rebuilding it each time
- use the minus icon to delete a shift
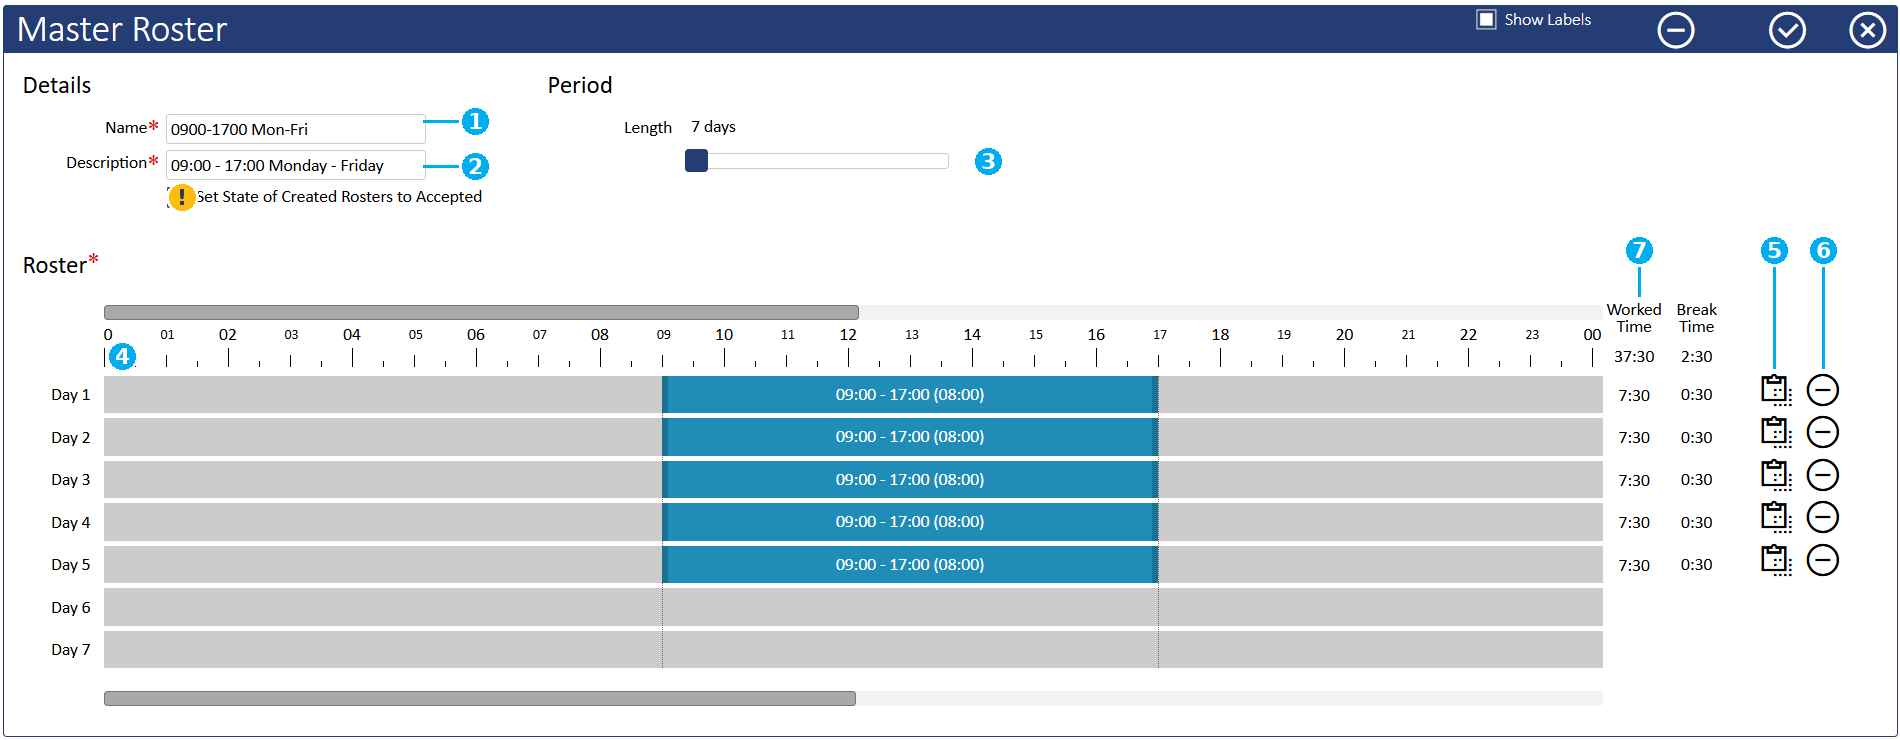
1 name field · 2 description field · 3 period length slider · 4 roster grid, where you drag to create and resize shifts · 5 clipboard icon, to copy a shift across days · 6 minus icon, to delete a shift · 7 worked and break time totals
Important: Day one lines up with the first day of your pay period. Check this before you add shifts — if day one is out of step with your pay period, every shift in the pattern shifts with it.
- Check the running worked time and break time totals, then save.
Important: You can’t assign a template until it’s saved. If you edit an existing template that’s already assigned, save your changes and then reassign it — saving alone won’t push the update to employees already on it.
Assigning a Master Roster to employees
Building a Master Roster doesn’t schedule anyone by itself — you then need to assign it.
From the template list
- Open the saved template and click Assign to Employees.
- Select the employees, then Apply.
- Set the From and Effective Start dates:
- From sets the origin of the repeating cycle — it determines which day of the pattern lines up with which calendar date. Employees who share the same From date stay in sync on the same rotation.
- Effective Start is when the pattern actually begins for the employees you’ve selected. This can match From (they start on day one), or be later (they join a rotation already in progress).
- Getting these wrong will skew the roster: for example, if your pay period starts on a Monday but you set the date to Tuesday, every subsequent shift will be off by a day.
- This split is useful when you want to keep a team locked to the same rotation cycle while individuals join on different dates — for example, a new starter joining an established four-week rotation partway through, without knocking the rest of the team out of step.
- Optionally set an end date. Leaving it blank means the pattern continues indefinitely, or until a new Master Roster is applied.
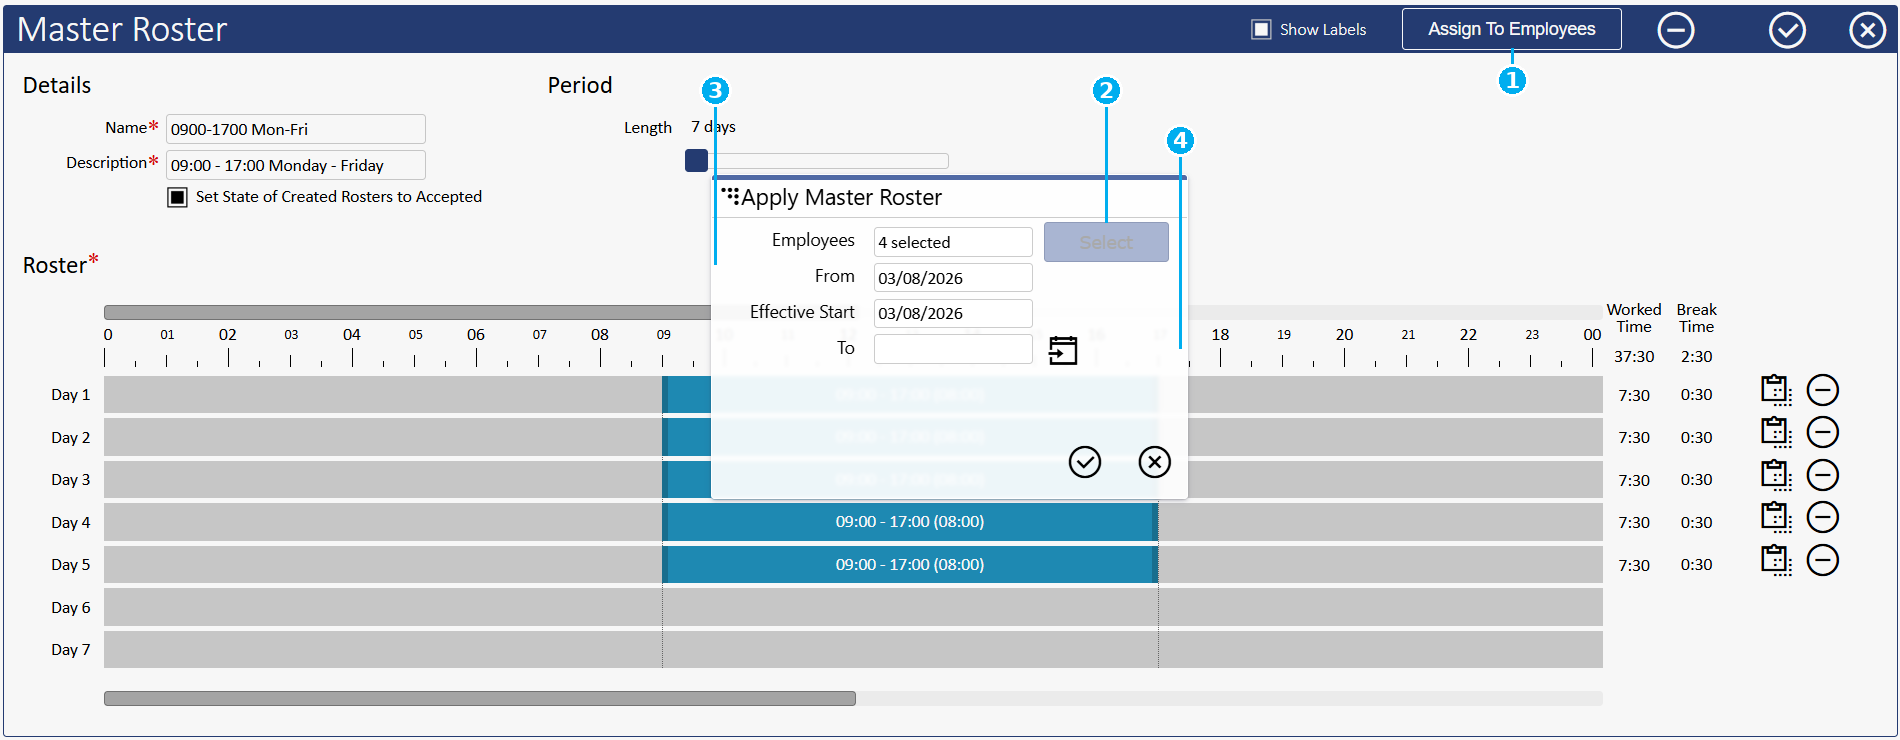
1 the Assign To Employees button that opens this dialog · 2 the Select button, to pick employees · 3 the From and Effective Start date fields · 4 the optional To (end date) field
From the employee’s roster screen
- Open their weekly roster, click the Master button.
- Select the template and apply. This defaults to the current period.
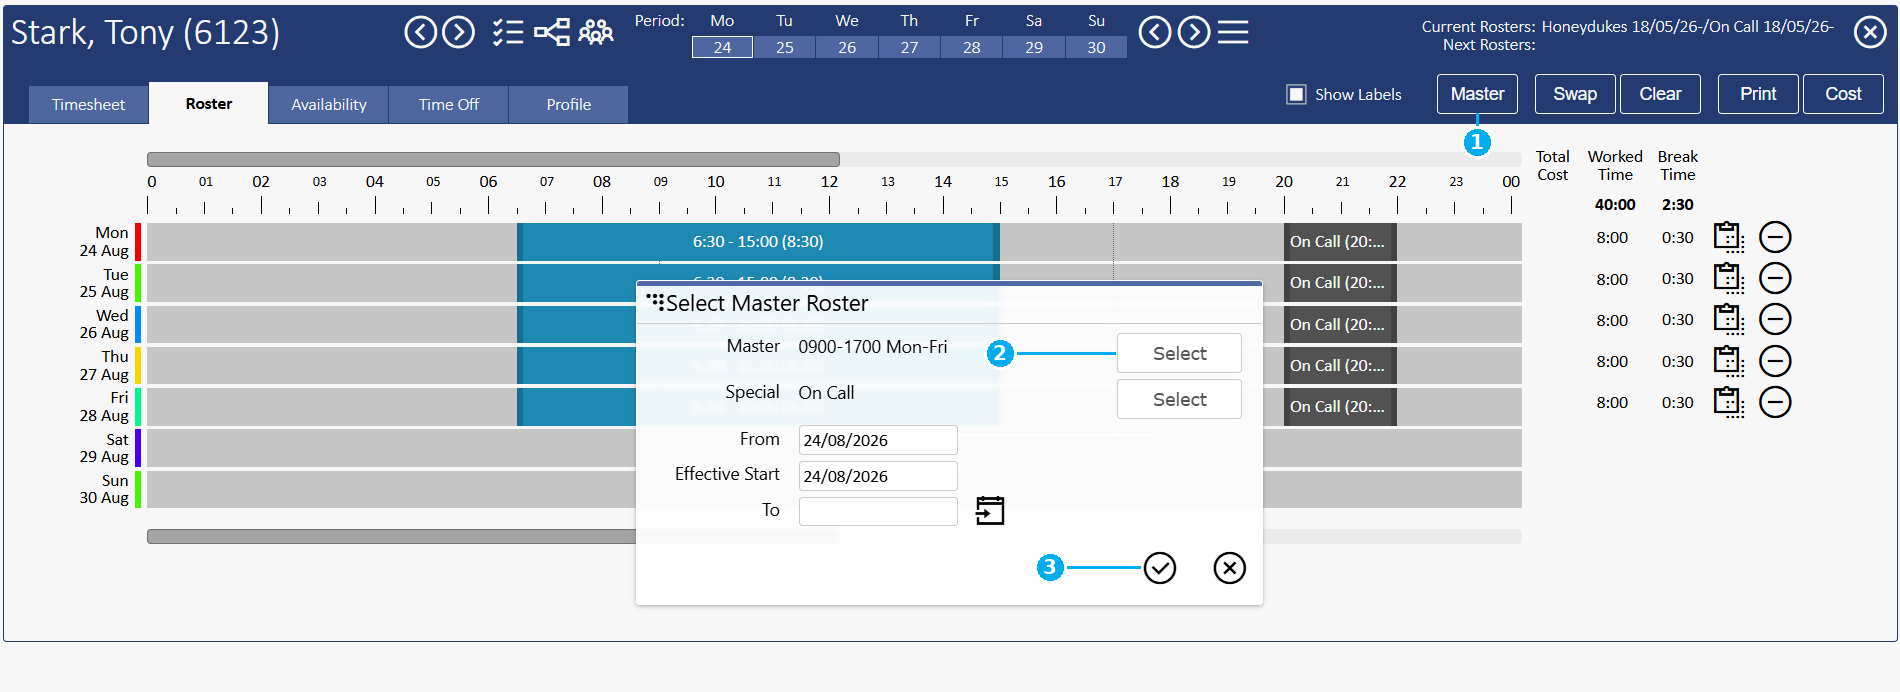
1 the Master button, which opens the Select Master Roster dialog · 2 the Select button next to the Master template row · 3 the checkmark button, to apply the selected template
Tips and good practice
- Name patterns for the role, not the person — e.g. “Weekday Days” rather than “Jane’s roster.” Patterns are meant to be shared, and names sort alphabetically in the list.
- Match the period length to reality — if the roster genuinely rotates over four weeks, set a 28-day period rather than forcing it into a weekly template.
- Double-check your From/Effective Start dates against your actual pay cycle before assigning — this is the most common source of a skewed roster.
- Keep the Master Roster as the source of truth. For one-off changes (a covered shift, a swap, a leave day), adjust the everyday roster — don’t edit the Master Roster unless the standard pattern has genuinely changed.
- Save, then assign — remember that changes to an existing template need to be saved and reassigned to take effect for employees already on it.
FAQ
If I change a Master Roster, do already-scheduled shifts change?
No — the template only updates a schedule once you reassign it. Save your changes, then reassign the template via Assign to Employees (or the Master button on the employee’s roster screen) for it to push through. Shifts you’ve already manually adjusted for a specific date keep your adjustments.
Can an employee move between patterns over time?
Yes — assign a new Master Roster with its own start date, and biotime handles the transition for you.
What’s the difference between a Master Roster and a Work Pattern?
A Master Roster defines the actual shifts employees work (times, breaks, jobs). A Work Pattern supplies the contracted hours per day that pay and award rules read — a number, with no shift times attached.
Is there a limit to how long a period can be?
Yes — the period length can be extended to suit longer rotations, up to a maximum of 168 days.
Related
Need a hand?
Our support team knows biotime inside out. Send us a message and we’ll get back to you, usually within one business day.
Prefer to call? AU 1300 139 460 · NZ 0800 111 438
From overseas: +61 7 5613 2700 · +64 9 820 3444
Monday to Friday, 8:30am – 5:00pm (AEST/NZST)